In today’s digital era, some transactions still require a paper trail. A receipt book serves this purpose efficiently, providing an instant, tangible record of monetary exchanges.
Whether you’re a small business owner, a freelance professional, or someone who regularly deals with cash transactions, knowing how to fill out a receipt book properly is a crucial skill. This guide will walk you through the process step-by-step, ensuring that you’re following best practices.
Why It’s Important to Fill Out a Receipt Book Correctly?
Let’s talk about receipt books. Why are they important? Well, for starters, they keep track of business expenses. Imagine this – you run a small business. You sell many items each day. Without a receipt book, how would you remember all the details? This is where a receipt book comes into play. It helps you remember. And, it helps your customers too.
Legal Implications of Filling Out a Receipt Book
Did you know, not keeping proper records can get you in trouble? The law says you must issue receipts. When a customer pays, they need proof. This proof is the receipt. It shows the total number of items purchased. It also shows any additional fees. For example, taxes or other fees. This way, the customer knows exactly what they paid for.
Plus, receipts are useful for tax purposes. They can prove you paid taxes on your sales. Or, they can show you charged your customers the right tax. If not, you could face legal issues. So, always remember to fill out your receipt book correctly.
Financial Management and Receipt Books
Receipt books also help manage your money. For instance, they can help you track your sales. Let’s say you sell more than one item. You write down all the items in your receipt book. Now, you have a record of what you sold. And, you can see how much money you made.
Receipt books are also great for tracking payments. Say, for example, a customer pays with cash. You write down the payment method in your receipt book. Now, you have proof of the payment. And, you can track how much cash you received.
Lastly, receipt books can help you track fees. Sometimes, you might charge extra for certain services. These fees go into your receipt book. This way, you can see how much extra money you made. All in all, a receipt book is a powerful tool. It helps you stay on top of your finances.
Understanding How to Fill Out a Receipt Book
So, you have a receipt book. What next? Now, it’s time to learn how to fill it out. It’s simple once you know how. First, we’ll look at the layout. Then, we’ll talk about what to write on a receipt.
The Basic Layout of a Receipt Book
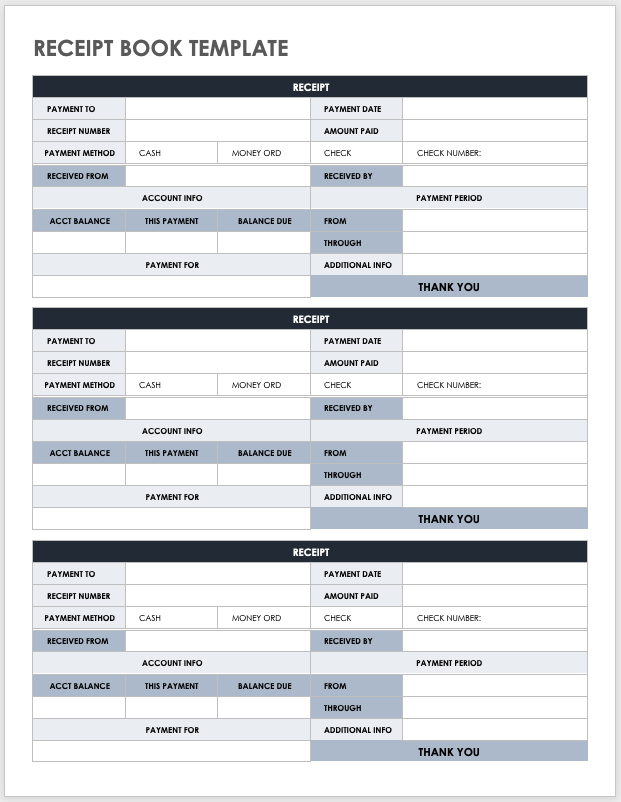
A receipt book has a simple layout. Each page is a receipt template. This template helps you write a receipt. It has places for all the details you need to record. For example, the date, the customer’s name, and what they bought. Think of it as a guide. It shows you what to write and where.
Usually, a receipt book has two copies of each receipt. One copy is for you, and one is for the customer. That’s why they’re also called as carbonless receipt book or books. When you write on the top receipt, it makes a carbon copy on the second one.
Crucial Elements in a Receipt
Every receipt has key parts. Firstly, the business name. This is your company name. Write it at the top of the receipt. Below it, add your address and company phone number. This way, your customer can reach you if they need to.
Next, list the items purchased. Write each one on a new line. After each item, write the price. At the end of the list, write the total amount. This is the grand total the customer pays. And Don’t forget about tax. Add any applicable taxes to the grand total.
Last but not least, write the payment method. Did the customer pay with cash? Or maybe they used a card? Write it down. It’s important to record how the customer paid. And that’s it. Now you know how to fill out a receipt book.
Step-by-Step Guide to Fill Out a Receipt Books

Let’s get practical now. Let’s learn step-by-step how to fill out a receipt book. By the end, you’ll be a pro. You will know all about writing the date and receipt number, recording details, and finalizing the receipt.
Writing the Date and Receipt Number
The first step is to write the date. Today’s date goes at the top of the receipt. It’s important. It shows when the transaction happened. The next step is the receipt number. Each receipt in your book should have a unique number. It helps you keep track. It also helps your customer. If they have a question, they can refer to the receipt number.
Recording Essential Details
Now, let’s record some details. Write your business name and address. Then, write the customer’s name. Don’t forget to write what they bought. List all the items. Write each one on its own line. Also, write the price of each item. This way, the customer can get individual receipts and see the cost of each item they bought.
If the customer bought more than one item, add up the prices. This is the subtotal. Write it at the bottom of the list. But, we’re not done yet. We still need to add any taxes or additional fees. Add them to the subtotal. This gives us the grand total. That’s how much the customer pays. Write this number clearly. Your customer needs to know how much they paid.
Finalizing the Receipt
Now, write the payment method. Did the customer pay with cash or card? Maybe they used a different method. Record it. This is important for your records. And, it helps your customer remember how they paid.
Finally, sign the receipt. Your signature makes it official. It shows that you agree with the details on the receipt. And, it gives your customer confidence. They know the receipt is genuine.
Common Mistakes When You Fill Out a Receipt Book
Filling out a receipt book? Beware of common mistakes. Here’s what to avoid and how to fix any errors.
Mistakes to Avoid
Forgetting the date or receipt number? That’s a no-no. These details help track sales and purchases. Always write them down.
Not listing all items bought? Another mistake. Each item and its price should be on a separate line. This keeps things clear for the customer.
Missed adding taxes or fees to the total? Always include the grand total. Customers need to know the exact amount they paid.
Forgot to sign? Your signature makes the receipt official. Never forget to sign.
How to Correct Errors in a Receipt Book
Small mistake like a misspelling? Draw a line through it. Write the correct info above. Initial the correction. That shows you recognize and fixed the error.
Big mistake? Write “VOID” on the original receipt. It’s no longer valid. Then, write a new receipt with the correct info. Don’t forget to give the customer a new copy.
Mistakes happen. The key is to correct them. This keeps your customers’ trust and your business running smoothly.
Tips to Fill Out a Receipt Book More Efficiently
Using a Template to Fill Out a Receipt Book
First up, think about using a receipt template. You can grab these from an office supply store or find templates online. A template makes sure you cover all the important details. It’s as simple as filling in the blanks.
Take a receipt book template as an example. It’s got spaces for the date, receipt number, and all items sold. It might even have spots for the customer’s name, how they paid, and the final total. Thanks to the template, your receipts will look professional every time.
Remember, a receipt isn’t just a form. It’s a record of a sale. So, be thorough and accurate when you fill it out.
Automating the Process
Want to speed things up? Try going digital. Lots of small businesses use digital receipt books or POS systems. These make receipts automatically when a customer pays.
With a digital system, you input the items bought. Then, the system works out the total, adding any tax or extra fees. It even makes a receipt number. All this happens in a flash.
What about cash payments? Just enter the payment as cash. The system will record it just like a card payment.
And the best part? Many systems can email the receipt to the customer. So, no more keeping track of carbon copy receipts. And it’s greener too.
So, if you want to fill out your receipt book more efficiently, consider these tips. They’ll save you time and help your business run like a well-oiled machine.
How Technology Can Help You Fill Out a Receipt Book

Technology can make many things easier. This includes filling out receipt books.
Receipt Book Apps and Software
Firstly, consider using a receipt book app or software. With this type of tool you can do much of the work. It’s like having a helper on your phone or computer.
For example, a receipt book app can create receipts. It uses the details you input, like the items sold and the total price. The app even adds the receipt number and date.
Also, an app can track business expenses. When you issue receipts, the app records the details. So, you can see how much money your business is making. Plus, this info is great for tax purposes.
Remember, many apps let you print receipts, too. So, you can give your customers a paper copy if they want one.
Transitioning from Paper to Digital
But, how do you switch from paper to digital?
First, choose a receipt book app or software. There are many options, so pick one that suits your business.
Then, start using the app for all your sales. Input the details of each sale, like the items sold and the payment method. The app will create the receipt.
What about old paper receipts? You can enter these into the app, too. This way, all your records are in one place. This makes it easier to track expenses and income.
Lastly, tell your customers about the change. You could do this on your social media accounts, or the next time they shop with you. They’ll appreciate knowing that you’re going green.
Frequently Asked Questions
Can I use a receipt book for my rent receipts?
A receipt book can be particularly useful for rent receipts. For each payment, you can provide your tenant with a written record of the transaction, including the date, amount paid, and method of payment. Make sure to include any details like the tenant’s name and the period the payment covers.
Is it necessary to provide a duplicate copy of each receipt?
The best practice is to provide a duplicate copy. One copy should go to the customer, and the other should stay in the book for your records. This helps you track business expenses and sales, and it also provides the customer with a proof of purchase. Carbonless receipt books are great for this purpose as they automatically create a duplicate copy of each receipt.
Can I create my own receipt book?
Creating your own receipt book can be a cost-effective solution. You can download templates online or use Microsoft Excel to design a receipt template that suits your needs. However, remember that a professionally printed receipt book often looks more credible to customers and is usually more durable.
What should I do if I make a mistake while filling out a receipt?
If you make a small error, like a misspelling or wrong number, simply draw a line through it, write the correct information above, and initial the correction. For major errors, void the original receipt and write a new one with the correct information. Mistakes happen, but it’s important to correct them promptly and clearly to maintain trust with your customers.
Conclusion

Filling out a receipt book correctly is an important skill for anyone conducting business transactions. Receipt books provide a tangible record of financial exchanges, aid in tracking business expenses, sales, and payments, and fulfill legal requirements.
Remember to always include vital information such as the date, receipt number, items purchased, total amount, applicable taxes, and the method of payment. The process can be simplified by using receipt templates or digital receipt book apps.
Whether you’re a small business owner or a freelancer, mastering how to fill out a receipt book can help you maintain accurate records and run your business smoothly.

Collect receipts from your email automatically!
Try WellyBox - your AI assistant for receipts


